In this article, I explain how to record your security camera to an FTP server.
It's possible to have a Free FTP server at home and avoid spending money with paid services. If that's what you want, please just keep reading.
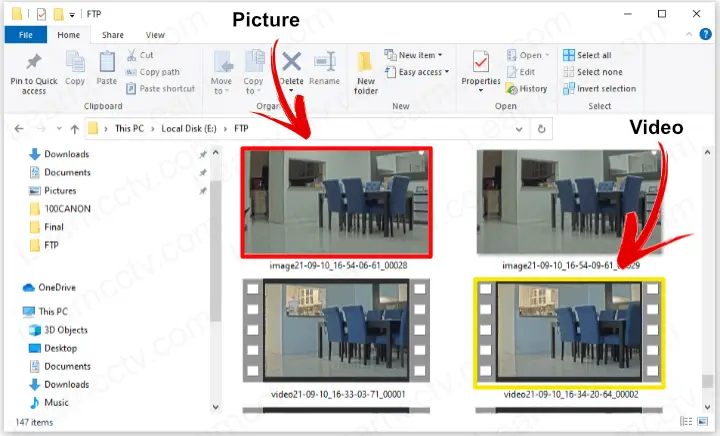
Pictures and files recorded to the FTP server (Filezilla)
Yes, I have a setup at my home, so this is not theory; it's the real deal 😉
As you can see in the previous picture, I have some Axis IP cameras, and I could make them record videos and pictures on a local server.
Depending on the IP camera model you are using, you can have pictures and videos recorded on your server. In my case, I can have both of them.
==> If you prefer to have a paid service up and running remotely on the Internet, please read the article: FTP Sever for IP camera.
Let's see how to set up your local server without expending a single dime!
How to record IP cameras to the FTP Server
To record videos and pictures from your IP camera to an FTP server, both devices must be connected to the network and ready to communicate.
You can either use a local or remote server as long as you have all the network configuration, routes, and firewall rules in place.
Have your device ready to communicate
For simplification, I show how to configure an Axis IP camera model P1365 MK II and the Filezilla FTP server in a local network. The devices are working in the same subnet, and there are no routes or port forwarding rules in the router.
The setup does not depend on a router, and I'm using a regular switch.
See the diagram below to understand the scenario.

As you can see, the devices are ready to communicate in the local network. It's possible to test the communication just by using the ping command.
This first step is crucial to guarantee that everything is going to work.
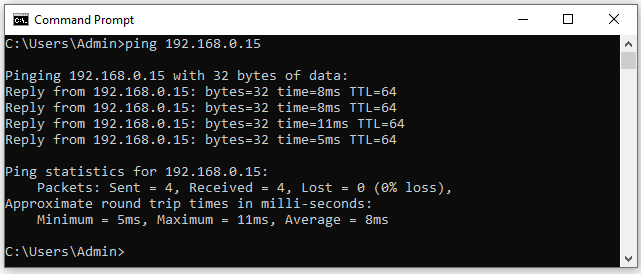
And now, you are ready to move on...
Setup the FTP Server and the IP camera
The IP camera needs to know which server it supposes to send the files to.
You must create a folder, username, and password in the FTP server and use such information to configure your IP camera. It's simple, but you need to pay attention to the details and get everything correct. Otherwise, it won't work.

Even in a local network, the Windows firewall can be a problem, so you need to make sure it's correctly configured before having your system working.
Now that you know the basics let's move to the configuration.
FTP server Installation and Setup
There are different software you can use, and some of them are free 🙂
I'm using Filezilla, which is free and easy to set up.
Here's the step-by-step on how to have the FTP service up and running.
- Create a folder on your computer to save the files
- Download and install Filezilla from the official website
- Create a rule in the firewall to allow incoming connections
- Configure Filezilla to allow the user to connect to the FTP server
The following pictures show the setup details.
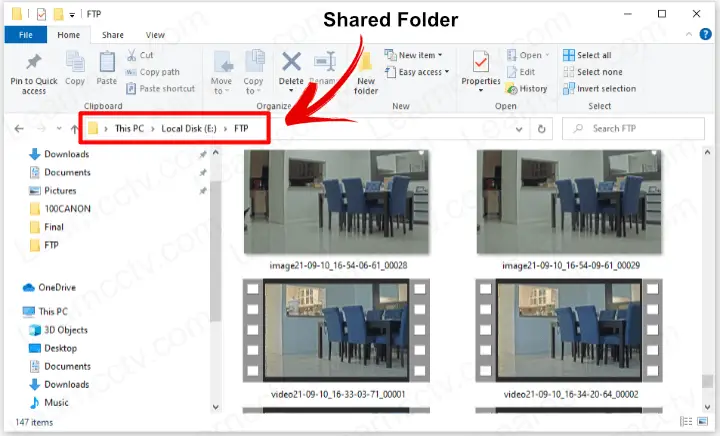
Share folder in the FTP server (Filezilla running on Windows 10)
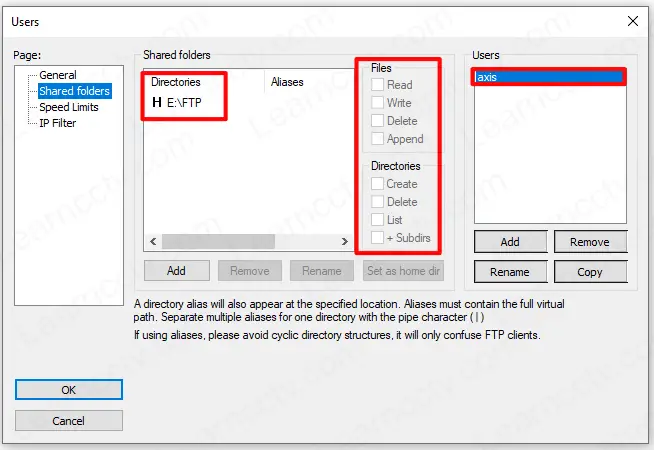
Directory (folder), permissions and users
Pay attention to the details, such as the correct permission to write in the folder.
And now you are ready to set up your IP camera.
Windows firewall setup
Now that you have your server ready to work, it's necessary to create a rule in the Windows Firewall to allow the incoming connections.
Here's how to create the rule.
- Open the Windows Defender Firewall.
- Click on "Advanced Settings".
- Select "Inbound Rules" and click "New Rule...".
- Select "Program" and click the Next button.
- Browse for the Filezilla Server executable file.
- Click the Next button and select "Allow connection"
- Click the Next button and check "Private".
- Click Next, give the rule a name and click "Finish".
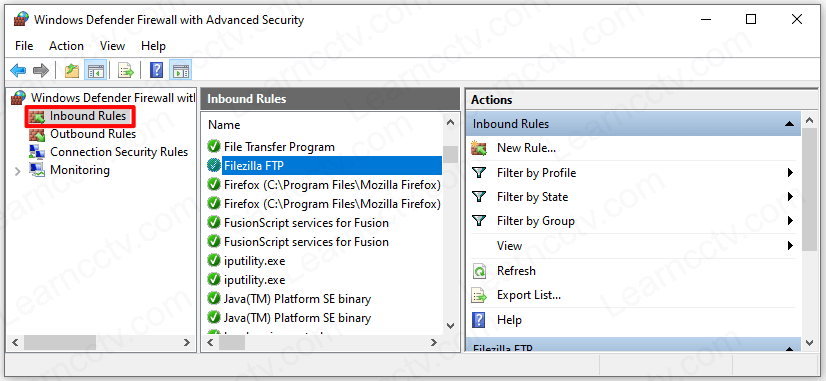
Yeah, now you are ready for the camera setup and testing.
IP camera Setup
The camera configuration varies according to the model and firmware version.
This example is for Axis cameras using firmware 9.8.x.x.
It might be different for your camera, but the main concept is the same.
You need to look for the FTP menu and enter the FTP server IP address and credentials, so the camera can connect to it; and them it's necessary to create the event (or events) that will trigger the FTP recording.
Here are the steps to set up an Axis camera to record into the FTP server.
Enter the Server information
- Open the menu: System >> Events >> Recipients.
- Enter the Server Name, IP Address, Port, and login credentials.
- Click the "Test" button to confirm the communication is OK.
- Click the "Save" button.
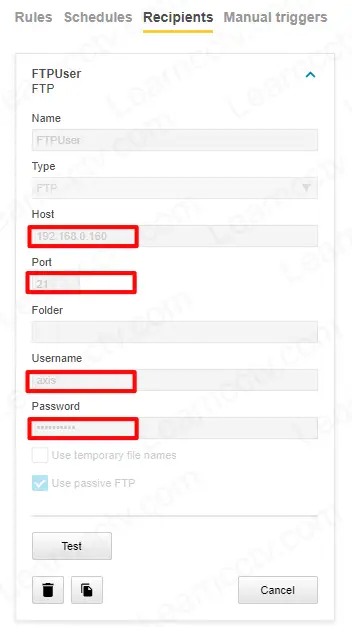
Configure the event to trigger the recording
- Open the menu: System >> Events >> Rules
- Create a rule with the condition to trigger the recording
- Choose the action (Send image or video to through FTP)
- Adjust the parameters according to your needs
- Click the "Save" button
- Test your configuration
The pictures below show the configuration details.
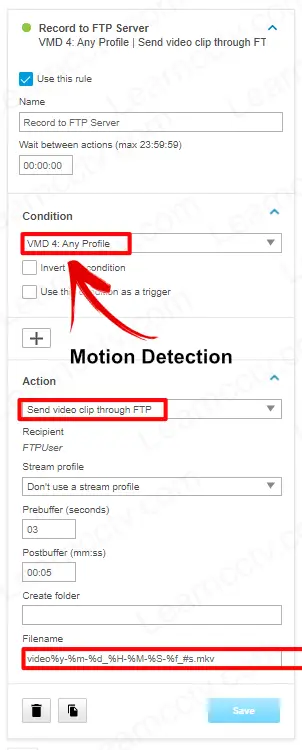
Motion detection is the most common condition to trigger the recording, but you can choose anyone better for your case (there are many of them in the menu).
Let's say you want to record video in the FTP server every time the camera detects audio, tampering, a rise in temperature, or something related to the camera state.
The pictures below show the configuration details.
Video: How to connect Axis camera to FTP Server
Here is a video showing the entire process.
Conclusion
You can set up your IP camera to record videos and pictures to an FTP server.
The features depend on the camera model you have; some of them only allow you to set up picture recording. Others (such as Axis) can record videos based on different events and schedules.
I hope this article can help you, please share it with your friends.